I learned how to attach garland on stairs after one December when half my greenery slid down the banister and scared the cat. The other half left sticky tape marks on the painted wood. Festive? Technically. Successful? Absolutely not. The fix is simple: use the banister’s shape, support the greenery in several places, and stop treating a staircase like a flat wall.
You do not need a $200 pre-lit garland or a professional installer. I have used faux cedar from a discount craft aisle, a $12 roll of velvet ribbon, and removable hooks that survived a full holiday season in our Fort Greene brownstone. Here is what actually holds, what looks cheap, and where I went wrong first.
Choose the right garland and measure first
Before buying anything, measure the handrail from the top newel post to the bottom post. Then add extra length for the drape. For a relaxed swag, add roughly 18 to 24 inches per section between attachment points. A straight, tightly wrapped look needs less, while a loose Victorian-style cascade needs more.
For a six-foot railing, I usually buy 8 to 10 feet of garland. For a staircase with a long landing or two runs, measure each portion separately. Do not assume one 6-foot strand will magically become 12 feet because the product photo showed a mansion staircase. It will become a sad, sparse vine with visible gaps.
Choose flexible garland with a wire core if you can. Wire lets you shape branches around the rail instead of forcing the whole strand into one stiff curve. Faux cedar, eucalyptus, pine, and mixed greenery all work. Avoid very heavy garland if you are renting or using removable hooks; a dense strand packed with pinecones and metal ornaments can pull a hook right off the wall.
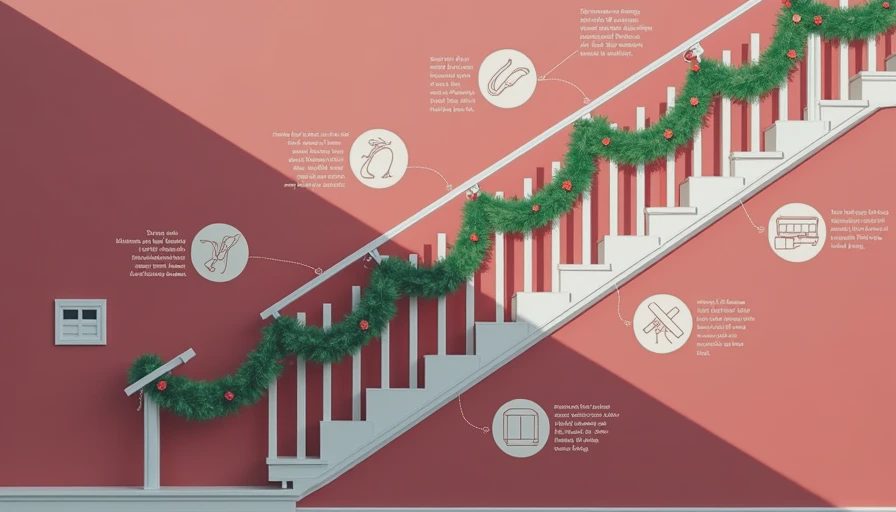
My favorite budget combination is one plain greenery strand, one ribbon, and a few lightweight ornaments. It looks more believable than garland covered in every decoration from the storage bin. Taste is free. Everything else, we thrift.
How to attach garland on stairs with removable hooks
The most renter-friendly method is to use small removable adhesive hooks along the underside or side of the banister. Clean the surface with rubbing alcohol, let it dry completely, and follow the hook package instructions. Do not stick them onto dusty wood, damp paint, or a rail covered in furniture polish. That is how you end up blaming the product for a preparation problem.
Place the first hook near the top post, then add hooks every 18 to 24 inches. If the garland is heavy, use closer spacing. I prefer hooks in the same color as the railing, or clear ones tucked beneath the handrail. Attach the garland with thin floral wire, green twist ties, or small reusable zip ties. Avoid bright white plastic ties unless your staircase is already hosting a very committed hardware-store theme.
Start at the top and work downward. Secure the greenery loosely at each hook so it can make a soft dip between points. Pulling it tight creates a stiff line that looks more like a misplaced extension cord than holiday decor. Keep the garland slightly below the gripping surface of the rail, especially if people use those stairs every day.
If your banister has turned spindles, you can loop ribbon or wire around selected spindles instead of installing hooks. Pick every third or fourth spindle for an even rhythm. Never wrap wire so tightly that it scratches the finish or prevents someone from gripping the rail.
Ribbon is the trick that makes cheap garland look intentional
Garland often looks skimpy because the greenery is doing all the work. Ribbon adds width and hides attachment points. I use wired ribbon, usually 2 1/2 to 4 inches wide, because it holds a curve. Velvet gives a moody old-house look, while cotton or linen feels quieter and less like a department-store display.
Make loose loops between the hooks, then tuck the ribbon into the greenery. You do not need a perfect bow at every point. In fact, you should not make one. Repeating oversized bows along a staircase can turn the whole thing into a parade float. One substantial bow at the top and one at the bottom is usually enough.
For a thrifted option, check fabric remnants, old table runners, or a damaged holiday skirt. Cut a long strip and finish the ends with fabric glue or a diagonal fold. I once paid $4 for a faded red velvet remnant at a flea market and got enough ribbon for the staircase, mantel, and dining chairs. The color was better than the shiny new stuff beside it.
How to attach garland on stairs without damaging wood
If your banister is stained, antique, or freshly painted, protect it before adding anything. Put a small piece of felt, cotton twill tape, or soft ribbon between the garland wire and the wood. This prevents scratches from movement, especially on a staircase where people brush past the decoration with coats and bags.
For a delicate finish, tie the garland to the railing with wide strips of ribbon rather than wire. Make a loose knot, check that it does not slide, and trim the tails at an angle. On a square modern rail, ribbon ties can look neat and deliberate. On a rounded rail, use two crossing loops so the greenery does not rotate.
Test one attachment point for an hour before decorating the whole staircase. Put a little pressure on the garland, walk past it with a coat, and see whether the hook shifts. I skipped this test once, installed the entire strand, and discovered that the adhesive hooks were attached to a layer of dust. Removing everything took longer than installing it.

Safety matters more than the perfect photo
A staircase is not the place for a decoration that moves underfoot or blocks the handrail. Keep greenery off the steps and away from the edge where shoes can catch it. Do not cover the entire gripping surface of the banister. Children, older adults, guests carrying laundry, and anyone walking downstairs before coffee all deserve a usable rail.
Keep cords from string lights away from walking paths. Use battery-operated lights with a timer if you want illumination, and inspect the wire before installing it. Avoid candles near faux greenery, even if the arrangement looks charming in a photograph. Faux foliage can melt or ignite, and a staircase gives fire a very efficient route upward.
Use lightweight ornaments made from wood, plastic, or paper. Glass ornaments belong in a safer location unless the staircase is rarely used and the decorations are firmly secured. Check the garland every few days for sagging hooks, loose wire, or branches that have fallen into the stair path.
A simple installation plan that works
First, measure the railing and buy more garland than the exact length. Second, clean and test your attachment points. Third, install hooks or prepare ribbon ties before lifting the greenery. Fourth, secure the garland from top to bottom, creating even swags. Fifth, add ribbon and only then place ornaments or lights.
Stand at the bottom of the staircase and look up. That is the view most people will have, and it reveals uneven spacing immediately. Then stand at the top and check whether the decoration blocks the landing or makes the rail awkward to use. If one section looks too full, move greenery toward the empty spot rather than adding another strand automatically.
The best staircase garland looks as though it belongs there, not as though it is wrestling the architecture. Spend $15 on hooks, ribbon, and thrifted greenery before spending $100 on a dramatic pre-made bundle. Your staircase needs good attachment points, a little restraint, and enough clearance for real life. That is how to attach garland on stairs so it stays festive, safe, and intact until you are ready to pack it away.


Letters
No letters yet — be the first to write.